|
| |
|
|
| |
Editors Note: This is
a post from the JoeList posted here with Bill's permission. I have been encoraging
Bill to make this thing a kit or a pre-assembled part (he has recently said he has
found a better part to use for the zener which gives even better noise performance
-- he has to buy them a 1,000 at a time and won't tell me what they are). Please
email
Bill and encorage
him to release this if you are interested.
Eddie "Obivaughn Kentubi" Vaughn of Vaughn Audio has recently posted a
snippet that explains how this works. |
|
| |
|
|
Hi Kurt, Joes:
I don't care to keep
this any great secret . . I just worked hard to get the theory into my head - much
digging thru old texts on tetrode theory - and I didn't feel like giving it away
. . . just wanted to have some fun is all, and maybe stimulate a little thinking
and re-evaluation of some tired old "standard procedures."
The way I do this little trick - as a couple of folks already knew - is to bypass
a zener with a cap. But, not just any zener and not just any cap. My favorite zener
is a 1N821, a 15 cent, 1/2 W, 6.2 volt part that is both very quiet and of nearly
zero tempco. I forget why 6.2V is the "magic" voltage for zeners but it
is, the noise falls thru the floor and the low tempco yields a very stable voltage
source . Maybe someone could post on this 6.2V business ...
|
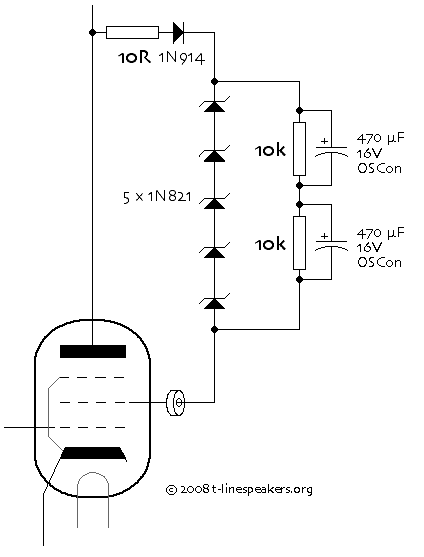
To build this:
- string five of the
1N821s in series and set them aside (1N821 now unobtainium, use an appropriate substitute
string of zeners)
- take two, 16V, 470uF
Sanyo OSCon caps and put a 10k resistor across each one, then hook the two RC combos
in series
- connect that assembly
across the zener string being sure to observe the polarity
- then put a 1N914 diode
& a 10R, 1/2 W resistor on the cathode end of the string and a resistive ferrite
on the anode end
- connect the other
end of the 10R to the plate of the tube to be "triode connected" and the
ferrite end of the assembly to the screen, and there you have it.
The 1N914 prevents
the screen's going into a runaway "negative impedance" mode where is it
emitting, rather than collecting, electrons.
The 10R resistor is
both a parasitic suppressor and a "fuse link;" ALWAYS use a 1/2W MF resistor
there, not something stout like a wirewound.
|
|
Note that if you are
using true, three grid EL34s that the suppressor is best connected to about -5V or
so. Just voltage divide off your bias supply. Biasing that grid slightly negative
reduces its electron interception to essentially zero.
Have fun discovering what a triode connected tetrode/pentode really sounds like.
Bill - PEARL, Inc.
And a bit of explanation
in another post:
> Will someone PLEASE
explain what the zener thing for strapping pentodes as triodes is all about?
Basically, this is just a method of "level shifting" the screen to a lower
DC potential than the plate and doing so thru a network with *very* low Z at audio
frequencies.
Why is this a good thing?
- Well if you look at
the plate curves for pentode/beam tetrode operation you see that plate current is
pretty much a function of screen voltage and that's why most amplification stages
that employ these devices also regulate the screen supply. Otherwise plate current
can be affected by the changes in screen voltage that will inevitably occur with
the changes in screen current that accompany signal. The object being of course to
provide a low-Z or "stiff" screen supply.
- While it's the desired
case for the turns of the screen grid lie within the "electron shadow"
created by the negative charge on the control grid, this seldom turns out to be achieved
in practice. Metal ceramic transmitting tetrodes being a notable and *very* interesting
exception ie. 4CX-125, -250, -350 and their ilk.
When the screen is less than perfectly shadowed, its ability to attract electrons
passing thru its accelerating, positive field on their way to the plate increases
dramatically. Current at voltage equals power and consequently the screen must be
able to effectively dissipate this, otherwise it will melt down eventually.
- The more nearly equal
the screen and plate voltages, the greater the screen current, and the greater the
changes in its value with signal.
- In "triode connected"
pet/tets, this issue is typically "addressed" by the insertion of 100 to
1K ohms in series with the screen. While this *will* reduce the screen's voltage
wrt to the plate and with that, the screen's current and consequent requirement for
dissipation, it is far from an ideal fix.
- Referring back to
(1), it will be seen that plate current is a function of screen voltage. If the screen
is intercepting electrons destined for the plate and if, triode-like, its current
flow varies with it voltage it can be seen that that the potential on the screen
will vary with the voltage drop across the resistor connecting it to the plate.
- By this action, the
effective impedance of the entire B+ supply is driven up by the insertion of a screen
resistor. This action is the cause of the "softish," "mellow"
sound universally reported when pet/tet/UL amps are "triode-connected"
- The solution for this
is to "level-shift" the screen to a lower DC level - thus limiting its
dissipation - and to bypass the level-shifting circuitry with a *low* impedance ie.
a *very* good, high value, low voltage cap of the BlackGate, Cerafine, OsCon variety.
- 1N821s work well for
this as they are sonically reasonably benign and completely bypassed down to very
low audio frequencies.
And another:
The deal is that what
you want to do is run the screen DC-level shifted some 30-odd volts -below- the plate's
voltage.
Thinking then in terms
of --electron flow-- (and not the usual, ass-about-face "current flow"
thrown at you in text books) work thru in your mind the correct polarity for the
zener string such that its operating in its Zener-breakdown mode when electrons are
flowing from the screen back to the plate connection on the OT.
That done, and remembering
that its perfectly possible for a screen's normal impedance to become what's known
as "negative." By that is meant that instead of -intercepting- a certain
percentage of the anode-bound electrons, it goes into a mode where it is -contributing-
to that flow; we say at that point that the screen's impedance has gone negative
and it being that the B+ supply's impedance is held as low as possible a little more
thought will bring you to the realization that a screen running as a negative impedance
is doing so in a mode where it sees no practical limit on the current it can contribute.
Now, current through
any (non-superconducting) conductor tends to cause it to heat up and high current
causes it to heat up a lot. Hot conductors more readily go thermionic than cold ones
and the moreso they go the hotter they get ... a self-stoking loop, a self-destructive
loop ... capiche ? ?
So, what sensible people
do is put a small-signal diode in series with the screen such that electrons can
move -only- from the screen to the anode.
All that done, screens,
contrary critters that they are, will sometimes just up and cack ... period ... get
over it.
Well you don't want
your dead screen supplying AMPS of current to, say, your control grid so a sensible
thing to do is to put a 1/2W 10R ** METAL FILM ** resistor in series with the screen
right at the point the screen-dropping circuit ties to the anode. Use a low-wattage,
metal film part because they make almost perfect fuses. Hit hard with a burst of
current they fritz pretty much instantly...
Even after all that,
things can sometimes just get sh*tty on you at very high frequencies . . . get over
that too. Dick around with about a zillion different kinds of ferrite beads placed
(oh yeah, this -is- tedious) right where the screen lead exits the tube socket. Some
beads sound rather better than others, the "resistive" ones seem best.
Finally, you don't
want all that -stuff- in the AC signal path so just bypass from the screen side of
the 10R resistor to the other other end of the zener string. In other words, bypass
around, and only around, the zener string.
And there you have
it.
|